Upgrading to Storefront 3.x
If you are currently running Storefront 2.6 or 3.0 and would like to upgrade to latest releases 3.x, it is very important to perform the following on all Storefront servers available before doing that:
1. Stop all StoreFront services
(Citrix Cluster Join Service, Citrix Configuration Replication, Citrix Credential Wallet, Citrix Default Domain Services, Citrix Peer Resolution Service, Citrix Service Monitor, Citrix Subscriptions Store and “Citrix Telemetry Service” if available)
2. Stop the World Wide Web Publishing Service.
3. Upgrade your Storefront servers & do not make the Store available for users until all servers in the group are upgraded.
Reconfigure the default service monitor so it uses HTTPS on port 443 (TCP) instead of default port 8000
1. Start PowerShell as an administrator on the primary Storefront server and run the following commands
# Import StoreFront API Modules
& “$Env:PROGRAMFILES\Citrix\Receiver StoreFront\Scripts\ImportModules.ps1”
$ServiceURL = “https://localhost:443/StorefrontMonitor”
Remove-DSServiceMonitorFeature
Install-DSServiceMonitorFeature -ServiceUrl $ServiceURL
Now reconfigure your Netscaler Storefront monitor by enabling (“Store Name”, “Storefront Account Service”, “Check backend Services” and “Secure”)
Treat Desktops as Applications (Moving Desktops to Application Tab)
By default your Desktops will be placed on a separate TAB (Desktops), which is Storefronts default behaviour. In that case, the workspace control will not have any effect of those, meaning, the desktop session reconnection will not happen on published Desktops.
As you may remember, it was possible to achieve this by adding TreatAsApp keyword to all published desktops back in Storefront 2.x releases, but enabling this feature using Storefront 3.x is much easier, as you can achieve this by a simpel configuration at store level instead of adding any TreatAsApp keyword to every Desktop available on your farms.
Use Powershell and enter the following (change the Store name accordingly)…
& “C:\Program Files\Citrix\Receiver StoreFront\Scripts\ImportModules.ps1”
Set-EnhancedEnumerationOptions -siteId 1 -storeVirtualPath /Citrix/Store ‘
-treatDesktopsAsApps $true
Disable Continual Horizontal Scrolling
Here’s a JavaScript customization by “Michael Bednarek from Citrix” to apply if you prefer to disable the horizontal continual scrolling behaviour in Storefront 3.0.
CTXS.UI.repeatAppGroupTiles = false;
If you are running StoreFront 3.0 – 3.5:
var oldAppBundleWidget = CTXS.Widgets.ApplicationBundlesWidget,
oldAppBundleWidgetPrototype = CTXS.Widgets.ApplicationBundlesWidget.prototype;CTXS.Widgets.ApplicationBundlesWidget = function ($applicationBundleContainer, applicationBundles, options) {this.options = $.extend({}, {}, options);this.$bundleContainer = $applicationBundleContainer;this.$carousel = this.$bundleContainer.find(‘.appBundles’);this.$carousel.html(CTXS.Views.ApplicationBundlesView.getApplicationBundleMarkup(applicationBundles, CTXS.UI.useSmallTiles()));this.applicationBundles = applicationBundles;this.$prevButton = this.$bundleContainer.find(‘.prevBundleOuter’);this.$nextButton = this.$bundleContainer.find(‘.nextBundleOuter’);if (CTXS.UI.useSmallTiles()) {this._applySmallUIResizing();} else {this._applyLargeUIResizing();}this._bindToUIEvents();if (this.applicationBundles.length > 0) {
this.$carousel.slick(‘slickSetOption’, ‘infinite’, false, true);
}};CTXS.Widgets.ApplicationBundlesWidget.prototype = oldAppBundleWidgetPrototype;CTXS.Widgets.ApplicationBundlesWidget.prototype.show = function() {if (this.applicationBundles.length > 0) {this.$bundleContainer.show();this.$prevButton.toggleClass(“hidden”, CTXS.UI.useSmallTiles());this.$nextButton.toggleClass(“hidden”, CTXS.UI.useSmallTiles());this.$carousel.slick(“setPosition”);}};
Change Receiver For Web Landing Page to “APPS” or “Desktops”
Alternativ 1:
Open (C:\inetpub\wwwroot\Citrix\StoreWeb\web.config) and edit the following code by replacing “auto” to “apps”:
<uiViews showDesktopsView=”true” showAppsView=”true” defaultView=”auto” />
to
<uiViews showDesktopsView=”true” showAppsView=”true” defaultView=“apps” />
Note! If you prefer display the Desktop page instead of Apps, just change the defaultView parameter to “desktops“ instead.
Alternativ 2:
Add the following code snippet to script.js under (C:\inetpub\wwwroot\Citrix\StoreWeb\custom)
var landingFolder = “apps” ;
CTXS.Extensions.afterDisplayHomeScreen = function () {
CTXS.ExtensionAPI.changeView(“store”);
CTXS.ExtensionAPI.navigateToFolder(landingFolder);
};
Changing pre-login background image
Navigate to (C:\inetpub\wwwroot\Citrix\StoreWeb\custom), put your background image under the custom folder and add the following rule into “style.css”
.web-screen {
background-image: url(yourCustomImage.jpg);
}
Replace the image file name as appropriate.
Attention: Alternative solution
If you rather not replacing any default images, you may like to take advantage of the “custom” folder to write some CSS that will override the files.
- Copy your custom image to the “custom” folder of the web site (it can be called anything you like, it doesn’t have to match the existing filename).
- Open the file “style.css” in the “custom” folder as an administrator, and add the following line:
.web-screen { background-image: url(yourCustomImage.jpg) }
Save the CSS file and refresh the page.
Changing the header of the page from the default solid color to a custom picture
Add the following CSS code to Style.css:
.theme-header-bgcolor{
background-image: url(yourCustomImage.jpg);
}
Replace the body with a custom picture (Background image)
Add the following CSS code to Style.css:
.storeViewSection {
background: url(‘yourCustomImage.jpg’) no-repeat center center fixed;
background-size: cover;
}
Replace the built-in AppBundle pictures by custom ones (Background images for the featured categories)
Make sure your custom app bundles pictures have a dimensions of 520×256 pixels before you upload them to the custom folder.
Add the following CSS code to Style.css:
appBundle2 for first picture from the left, appBundle4 for second picture, appBundle6 for third picture and so on…
.appBundle2 {
background-image: url(‘yourCustomImage1.jpg’);
}
.bundleDetail.appBundle2 {
background-image: url(‘yourCustomImage1.jpg’);
background-size: 100% 200%;
}.appBundle4 {
background-image: url(‘yourCustomImage2.jpg’);
}
.bundleDetail.appBundle4 {
background-image: url(‘yourCustomImage2.jpg’);
background-size: 100% 200%;
}.appBundle6 {
background-image: url(‘yourCustomImage3.jpg’);
}
.bundleDetail.appBundle6 {
background-image: url(‘yourCustomImage3.jpg’);
background-size: 100% 200%;
}
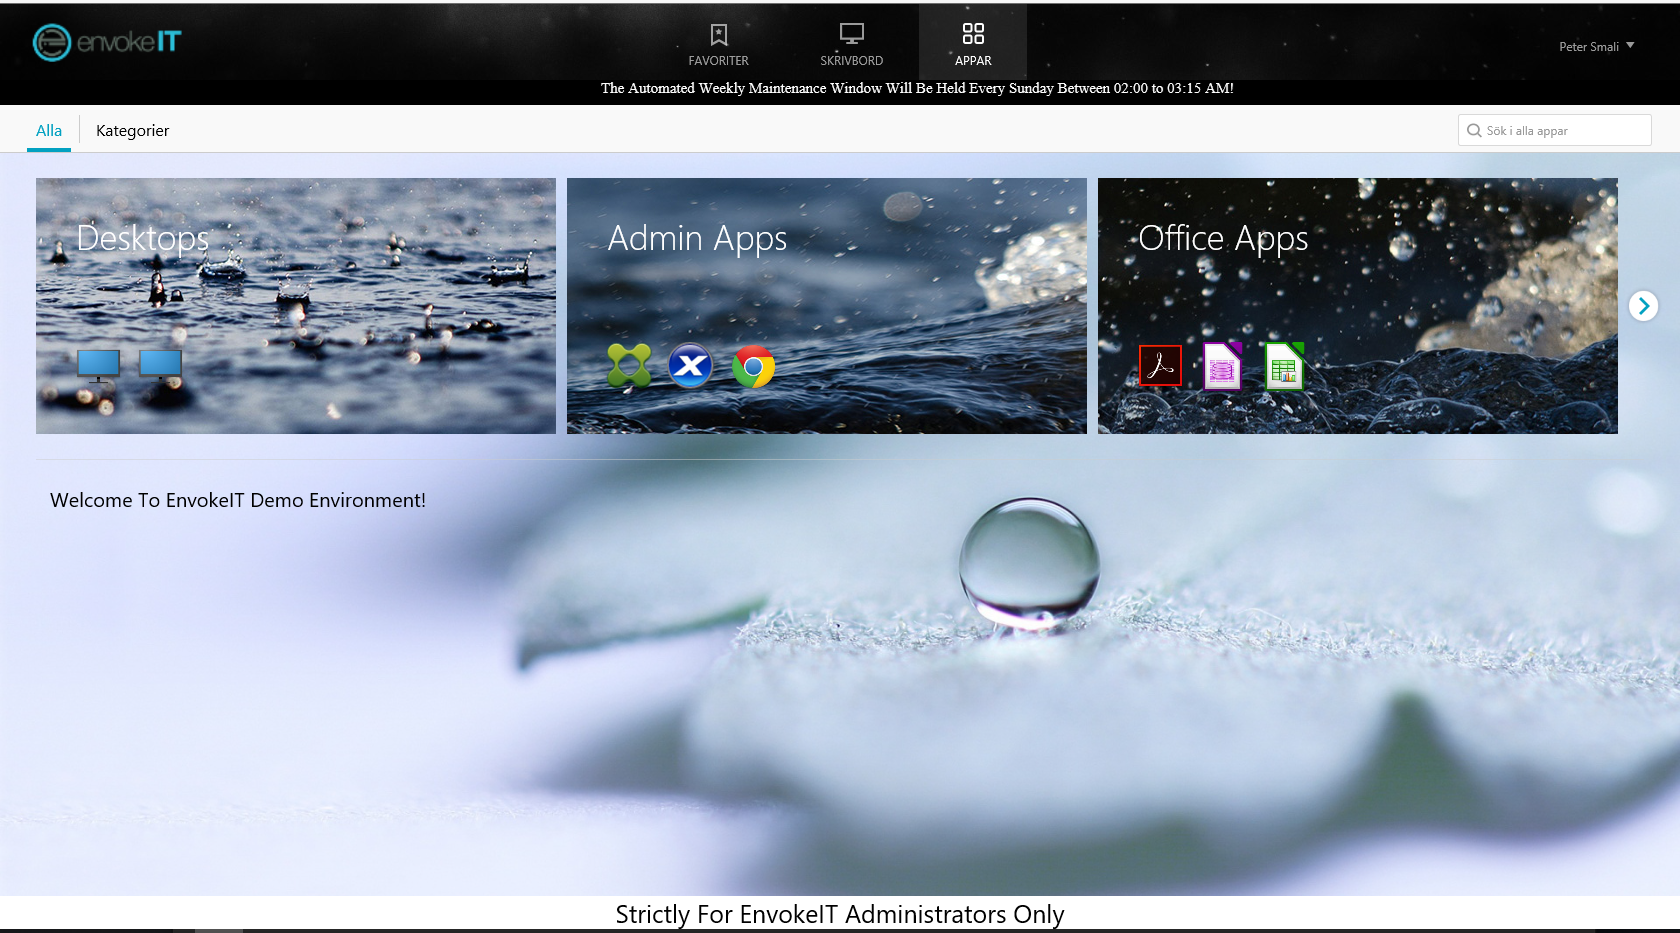
Hide all Apps from the App folder.
This could be helpful if you already configured featured app groups from Storefront admin GUI.
Add the following code to “script.js” under custom folder
var bundleApps = [];
CTXS.Extensions.sortBundleAppList = function(apps,bundle, defaultfn) {
  for (var i = 0; i < apps.length; i++) {
    bundleApps.push(apps[i]);
  }
  defaultfn();
};

CTXS.Extensions.filterAllAppsDisplay = function(allapps) {
  for (var i = 0; i < allapps.length; i++) {
    if ($.inArray(allapps[i], bundleApps) != -1) {
       allapps.splice(i, 1);
       i--;
    }
  }
};
Then change the test string “All Apps” to something else like “Welcome to EnvokeIT Demo Environment!” by editing “strings.en.js” and the “strings.’Your Language Code’.js” (Exampel: strings.sv.js for swedish)
(function ($) {
$.localization.customStringBundle(“en”, {
AllAppsTitle: “Welcome to EnvokeIT Demo Environment!“,
});
})(jQuery);
Add a link to “Citrix Receiver download page” in the header
First, you need to add the following code to “script.js” under custom folder Note! Download the new receiver icon and upload it to the “media” folder!
$(‘#customTop’).html(“<a href=’http://receiver.citrix.com/’ target=’_blank’><img src=’media/receiver-icon-smal.png’> Download Citrix Receiver</a>”);
Now, add the following css code to “style.css” to tweak position, color and font size of the text.
#customTop {
text-align: center;
background-color:#f9f9f9;
color: #574f5b;
font-size: 13px;
padding-top:15px;
margin-bottom:-30px;
}
#customTop a {
color: #574f5b;
}
Change any text used in Storefront UI
First of all you need to decide what to change. You may want to take a look at the localization directories (different languages), located here: C:\inetpub\wwwroot\Citrix\StoreWeb\receiver\js\localization\ Navigate to your language folder and open the ctxs.strings_…..js file to check what text to modify…
Exampel: I open the english file “ctxs.strings_BA0A6F9FF8511CBD” using Notepad++, and I see the following: InstallReceiver: “Install Receiver…”,
Let’s change “Install Receiver…” to something else like “Install Citrix Receiver Client” by applying the code below to C:\inetpub\wwwroot\Citrix\StoreWeb\custom\strings.en.js
(function ($) {
$.localization.customStringBundle(“en”, {
InstallReceiver: “Install Citrix Receiver Client“,
});
})(jQuery);
Make the folder view the default, when users go to the Apps tab Add the following code to script.js file
$(‘#customScrollTop’).append(‘<div class=”whitespace”></div>’);
CTXS.Extensions.onViewChange = function(view) {
if (view == “store”) {
$(‘.whitespace’).height(5000);
window.setTimeout(function() {
CTXS.ExtensionAPI.navigateToFolder(“/”);
$(‘.whitespace’).height(0);
}, 1);
}
};
Add a footer to all pages
Add the following to C:\inetpub\wwwroot\Citrix\StoreWeb\custom\strings.en.js
$(‘#customBottom’).html(“Strictly For EnvokeIT Administrators Only”);
and you may want to style it a bit by adding the following to Style.css:
#customBottom
{
text-align:center;
font-size:25px;
position:static;
}
Display Published Application Name Based On User Language Settings
Well! As per today, there is no way of providing an automatic translation of published application names, but you can make this happen by adding some custom code to some files located at “receiver for web” custom folder, typically located here: C:\inetpub\wwwroot\Citrix\YourStoreNameWeb
Navigating to the following foler C:\inetpub\wwwroot\Citrix\YourStoreNameWeb\Custom you should see some files named strings.countrycode.js (strings.da, strings.de, strings.en, strings.es, strings.fr, strings.it…)
What we need to do now is locating the string files crresponding to the language that you wish to provide some published application name translation for, and edit it by adding some code…
To make this simpler let’s suppose we would like to provide our spanish users with some app name translations. We have Two published apps (“Internet Explorer” and “Notepad”), and we would like to display those as ( “Explorador De Internet” and “Bloc”) for our spanish users…
Open strings.es using Notepad (as administrator) and you should see the following default code:
(function ($) {
$.localization.customStringBundle(“es”, {
Example1: “Esto es un ejemplo”,
Example2: “Esto es otro ejemplo”
});
})(jQuery);
Now we need to add two more lines (depending on how many application name you would like to translate, you may want to provide application name translation for all your apps, in this case we just have two apps to consider). Start by adding a coma at the end of Example2…
(function ($) {
$.localization.customStringBundle(“es”, {
Example1: “Esto es un ejemplo”,
Example2: “Esto es otro ejemplo”,
“Internet Explorer”: “Explorador De Internet”,
“Notepad”: “Bloc”});
})(jQuery);
Last step would be to update the “script.js” file, located at the same “custom” folder with the following code
CTXS.Extensions.preProcessAppData = function (_, appData) {$.each(appData.resources, function (i, app) {var localizedAppName = $.localization.string(app.name);if (localizedAppName) {app.name = localizedAppName;}});};
When you are done with some of the above configuration you may end up with something like this:
Disable CRL Check
Run the following PowerShell commands to prevent Storefront from certificate revocation check, especially when Storefront servers do not have any Internet access. The CRL check could delay the logon process by 1-3 seconds
Add-PSSnapin Citrix.DeliveryServices.Framework.Commands
Set-DSAssemblyVerification $false
Make sure you disable NetBios on NIC level as well
How to treal Desktops as Apps
Desktops are per default placed in a separate tab then the applications. It could be a good idea to have both Desktops and published Apps displayed all together under Application tab for workspace control reasons (re-connection in receiver for web cases). This can simply be achieved by the following code snippet…
& “C:\Program Files\Citrix\Receiver StoreFront\Scripts\ImportModules.ps1” Set-EnhancedEnumerationOptions -siteId 1 -storeVirtualPath /Citrix/Store ` -treatDesktopsAsApps $true
Display Storefront Server Name
Make troubleshooting easier by printing the Storefront server name on Storefront portal…
Follow the steps below to make this work:
- Logon to your Storefront servers, start IIS and select “Default Web Site”
- Select “HTTP Response Headers” and click “Add…” on action view to add a custom HTTP Response Header by providing a name (common for all Storefront servers) and value (unique for each storefront server)
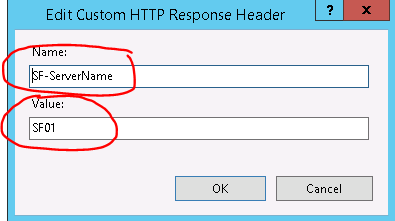
Make sure the Entry Type is “Local”
3. Start Notepad as administrator and open style.css located here: C:\inetpub\wwwroot\Citrix\YourStoreNameWeb\Custom and add the following code:
.customAuthFooter
{
font-size:12px;
color:Black;
bottom:10px;
text-align: center;
}#customBottom
{
text-align:center;
font-size:12px;
color:Black;
padding:10px;
position:static;
}
4. Start Notepad as administrator and open script.js located here: C:\inetpub\wwwroot\Citrix\YourStoreNameWeb\Custom and add the following code:
var req = new XMLHttpRequest();
req.open(‘GET’, document.location, false);
req.send(null);var servername = req.getResponseHeader(‘SF-ServerName’);
$(‘.customAuthFooter’).html(servername);
$(‘#customBottom’).html(servername);
Do an IIS Reset to apply the changes…
Reset Storefront to factory default settings
Make sure the Storefront management console is closed, and Start PowerShell as administrator and type the following:
asnp Citrix*
“C:\Program Files\Citrix\Receiver StoreFront\Scripts\ImportModules.ps1”
Clear-DSConfiguration
Thanks for these valuable code snipits.
Have you figured out a way to get the Featured appsto display in the same way as in the “All Apps” section? I like the way you hide the all apps and only display apps in featured apps sections, but it would be nice to also show the name for each published app. Try publishing Citrix Studio, Citrix director and Citrix StoreFront mgmtn cosoles and you will understand what I mean as tehy all share the same default icon and so looks the same. Obviously this goes for other apps to…
Any suggestions would be appreciated.
/Tord Bergset
Hi Tord 🙂
I see what you mean. I’ll give it a try and see what I can do. I’ll get back to you on this one.
We are using Storefront 3.8 and the code to Hide all Apps from the App folder is not doing anything. The remainder of the customizations work. Any ideas?